Introduction
Adding a new Hard Disk Drive (HDD) to an Ubuntu Server can be necessary for several reasons, and it often revolves around the need for additional storage capacity or for specific use cases. Here are some common reasons why you might need to add a new HDD to an Ubuntu Server:
- Insufficient Storage Space
- Separation of Data
- Backup
- Redundancy
- Performance Improvement
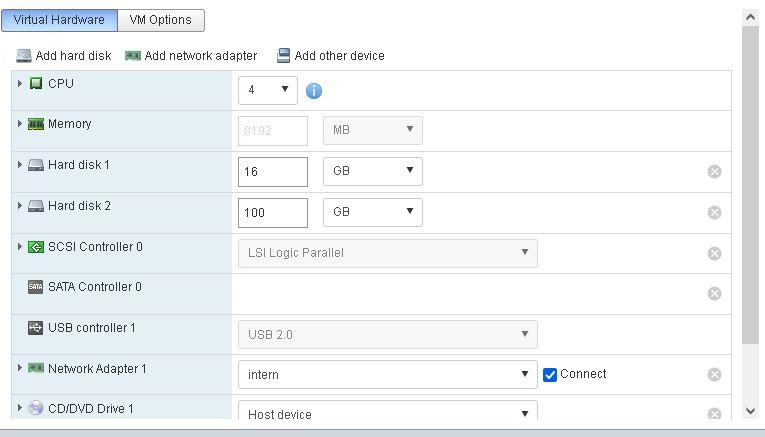
Adding a new Hard Drive to the Ubuntu Virtual Machine or Server
Step 1: Check installed HDDs
Execute the command df -h to check disk usage on your system.
df -hOutput:
root@scripts:~# df -h
Filesystem Size Used Avail Use% Mounted on
tmpfs 96M 2.9M 93M 3% /run
/dev/sda2 21G 11G 8.7G 56% /
tmpfs 479M 0 479M 0% /dev/shm
tmpfs 5.0M 0 5.0M 0% /run/lock
/dev/sdb1 91G 728M 85G 1% /opt/downloads
tmpfs 96M 4.0K 96M 1% /run/user/1000
Disk usage on the drives:
- /dev/sda2 21G 11G 8.7G 56% /
- /dev/sdb1 91G 728M 85G 1% /opt/downloads
Execute the command lshw -C disk
lshw -C diskOutput of the command will show more information about installed drives:
root@scripts:~# lshw -C disk
  *-disk:0
       description: SCSI Disk
       product: Virtual disk
       vendor: VMware
       physical id: 0.0.0
       bus info: scsi@32:0.0.0
       logical name: /dev/sda
       version: 2.0
       size: 21GiB (22GB)
       capabilities: gpt-1.00 partitioned partitioned:gpt
       configuration: ansiversion=6 guid=5052e3a8-005c-4ad7-b4ec-90473eff1f8a logicalsectorsize=512 sectorsize=512
  *-disk:1
       description: SCSI Disk
       product: Virtual disk
       vendor: VMware
       physical id: 0.1.0
       bus info: scsi@32:0.1.0
       logical name: /dev/sdb
       version: 2.0
       size: 100GiB (107GB)
       capabilities: gpt-1.00 partitioned partitioned:gpt
       configuration: ansiversion=6 guid=c9257d9b-898c-408c-8a23-06c59e79f317 logicalsectorsize=512 sectorsize=512
Step 2: Install HDD in Virtual Server or Server and reboot it
Check Disks again to find a new installed drive:
root@scripts:~# lshw -C disk
*-disk:0
description: SCSI Disk
product: Virtual disk
vendor: VMware
physical id: 0.0.0
bus info: scsi@32:0.0.0
logical name: /dev/sda
version: 2.0
size: 21GiB (22GB)
capabilities: gpt-1.00 partitioned partitioned:gpt
configuration: ansiversion=6 guid=5052e3a8-005c-4ad7-b4ec-90473eff1f8a logicalsectorsize=512 sectorsize=512
*-disk:1
description: SCSI Disk
product: Virtual disk
vendor: VMware
physical id: 0.1.0
bus info: scsi@32:0.1.0
logical name: /dev/sdb
version: 2.0
size: 100GiB (107GB)
capabilities: gpt-1.00 partitioned partitioned:gpt
configuration: ansiversion=6 guid=c9257d9b-898c-408c-8a23-06c59e79f317 logicalsectorsize=512 sectorsize=512
*-disk:2            -> NEW DRIVE
description: SCSI Disk
product: Virtual disk
vendor: VMware
physical id: 0.2.0
bus info: scsi@32:0.2.0
logical name: /dev/sdc
version: 2.0
size: 50GiB (53GB)
configuration: ansiversion=6 logicalsectorsize=512 sectorsize=512
Compare the last lshw -C disk output with the command output from Step 1 and there will be a new hard drive *-disk:2
Very important is to remember logical name: /dev/sdc for the new drive. We will use it for partitioning in the Step 3.
Step 3: Create a partition on the new inserted drive
# Create partition
sudo fdisk /dev/sdc

# Open help menu
Command (m for help): m -> Type m

Help:

  DOS (MBR)
   a   toggle a bootable flag
   b   edit nested BSD disklabel
   c   toggle the dos compatibility flag

  Generic
   d   delete a partition
   F   list free unpartitioned space
   l   list known partition types
   n   add a new partition
   p   print the partition table
   t   change a partition type
   v   verify the partition table
   i   print information about a partition

  Misc
   m   print this menu
   u   change display/entry units
   x   extra functionality (experts only)

  Script
   I   load disk layout from sfdisk script file
   O   dump disk layout to sfdisk script file

  Save & Exit
   w   write table to disk and exit
   q   quit without saving changes

  Create a new label
   g   create a new empty GPT partition table
   G   create a new empty SGI (IRIX) partition table
   o   create a new empty DOS partition table
   s   create a new empty Sun partition table
# Press "n" to add a new partition

Command (m for help):
All unwritten changes will be lost, do you really want to quit?
Command (m for help): n
Partition type
   p   primary (0 primary, 0 extended, 4 free)
   e   extended (container for logical partitions)

# Press "p" to create primary partiton

Select (default p): p

# Just press enter
Partition number (1-4, default 1):

# Just press enter
First sector (2048-104857599, default 2048):

# Just press enter
Last sector, +/-sectors or +/-size{K,M,G,T,P} (2048-104857599, default 104857599):

Created a new partition 1 of type 'Linux' and of size 50 GiB.

# Press "w" to write table to disk and exit

The partition table has been altered.
Calling ioctl() to re-read partition table.
Syncing disks.
Step 4: Check created partition
root@scripts:~# fdisk /dev/sdc

Welcome to fdisk (util-linux 2.37.2).
Changes will remain in memory only, until you decide to write them.
Be careful before using the write command.

Command (m for help): p
Disk /dev/sdc: 50 GiB, 53687091200 bytes, 104857600 sectors
Disk model: Virtual disk
Units: sectors of 1 * 512 = 512 bytes
Sector size (logical/physical): 512 bytes / 512 bytes
I/O size (minimum/optimal): 512 bytes / 512 bytes
Disklabel type: dos
Disk identifier: 0x3b162f62

Device Boot Start End Sectors Size Id Type
/dev/sdc1 2048 104857599 104855552 50G 83 Linux
Step 5: Format new partition
root@scripts:~# sudo mkfs -t ext4 /dev/sdc1
mke2fs 1.46.5 (30-Dec-2021)
Creating filesystem with 13106944 4k blocks and 3276800 inodes
Filesystem UUID: ab714abb-3dc6-44e9-a542-6e5c242168e2
Superblock backups stored on blocks:
        32768, 98304, 163840, 229376, 294912, 819200, 884736, 1605632, 2654208,
        4096000, 7962624, 11239424

Allocating group tables: done
Writing inode tables: done
Creating journal (65536 blocks):
done
Writing superblocks and filesystem accounting information: done
Step 6: Add new Mount Point
To add a new mount point, follow the following instructions:
- Create a directory for the new mount point
- Manually mount point
- Edit /etc/fstab file
# Create directory
mkdir /opt/downloads

# Add manually mount point
sudo mount /dev/sdc1 /opt/downloads


# Update /etc/fstab for automatic mounting (optional but recommended):
# To ensure that the new disk is mounted automatically on system boot,
# add an entry to the /etc/fstab file. Edit the file and add a line
# like:

sudo nano /etc/fstab

# Add the following line
/dev/sdc1   /opt/downloads   ext4   defaults   0   2
Articles with similar topics
Discover more articles with similar topics:


